

Friday, February 12, 2016
Henry Glass Winter Look Book and Newsletter
Here is the Henry Glass Winter 2016 Look Book. Click on the picture below to view!
Wednesday, February 3, 2016
A Close Up View of the Get Outta Town Bag
We love all the beaches and pools here in Georgia! It's so hot in the summer that when your outside literally it's because you are on your way to the beach or the pool!
Some of my most favorite projects come out of necessity. This one definitely fits into that category. I needed a large bag to fit all of our swim gear into and honestly I couldn't find one. So the night before a trip to Savannah, I threw together a bag similar in size to the "get outta town" bag. This bag went with us everywhere and made my day trips so much easier and organized!

My favorite thing about this bag is the size and all the pockets and places to organize all your must haves when you're outta town! Here it is, a close up view of the "get outta town" bag.
The front and the back of the bag are identical. Sporting three separate open pockets along the front, there is plenty of room with three more on the back.

The side pockets have cinch ties to hold bottles of water, sun screen, or whatever you need to get a hold of quickly. A magnetic closure is used along the top edge of the bag. The straps are secured in the seam along the bottom of the bag and are topstitched for strength and security.
 As you can see above, there is plenty of room for towels, sun screen and tons more. Inside, there is a large zipper pocket that spans the length of the bag. I love the zipper pocket because I know that all my important items, keys and cash are safely tucked away and won't unexpectedly fall out. On the opposite side, there are three open pockets that can easily be mimicked to replace the zipper pocket if you are not comfortable with sewing a zipper. I do urge you to give it a try, because once you do, you will love zippers….and they really aren't hard.
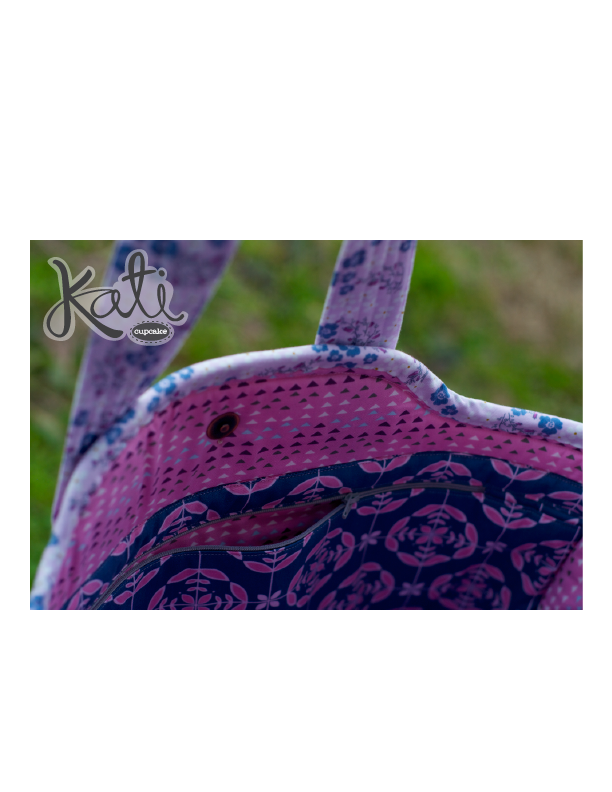
I hope you've enjoyed this close up view of the "get outta town" bag.
Friday, January 22, 2016
Eye Masks, Mustaches & Birthdays!
Where in the world have the years gone? My baby girl is turning 11 next month! She keeps reminding me that next year when she turns 12 she'll be a pre-teen? Why do they want to grow up so fast?! Yikes..
Even though I'm apposed at her getting older, we are going to celebrate her birthday this year…..with a stache bash. She is obsessed with those cute little mustaches….so mustaches it is!
I've come up with a quick eye mask pattern equipped with a mustache felt appliqué. I also added a heart appliqué in with the pattern pieces just incase anyone wants to make one for your cute little valentines. I hope you join me and make a few for all your special little peeps!
CLICK HERE for access to the material list and pattern pieces.
Click on the link above. Download the file. Open the file and print. Make sure to mark scale and 100%.
I've added a 1" box just as a test so that you can double check the pattern pieces have printed out correctly. Measure the box and if it's 1", your good to go. I know everyones computers and printers are different, so if you have a hard time, shoot me an email amy@katicupcake.com and I will be happy to email you the file.
Note ~ This pattern was specifically made for 10/11 year olds, but would be very easy to trim down and bit for smaller children. It fits me (and my almost 11 year old), so really the only other adjustment would be the fold-over elastic measurement. Just use your model to get the desired elastic length. I found the fold-over elastic at my local craft store.

First, cut out the mask pattern piece.

RSO, stack both 9" x 5" main fabric pieces together. Pin the pattern piece onto the fabric and cut through both layers. (I use my rotary cutter because it's quick, but you can certainly use your scissors if it makes you feel more comfortable.)

Using the same pattern piece, cut out 2 pieces of Bosal light fusible batting or fusible fleece.
If you haven't used the Bosal light fusible batting, you are in for a surprise! Unlike fusible fleece, it bonds to the fabric very securely and doesn't pull away. It truly is fabulous! I've also noticed that with fusible fleece it gives my fabric kind of a bumpy texture. With Bosal, you get a nice smooth finish. fusible fleece is a lot easier to find, so if that's what you have, it will work just fine.
Press the fusible fleece to the wrong side of each mask piece. Once it's bonded to the wrong side, flip it over and press from the right side of the fabric. This will give the fusible fleece a stronger bond to the fabric.
Trace the mustache onto the HeatnBond Light, you can subsitute with wonder under, but HeatnBond works so much better on felt and wools.

Cut out the traced mustache or heart about a 1/4" larger all the way around the appliqué pattern. Press the HeatnBond to the wrong side of the felt.

Once it's bonded to the wrong side, flip it over and press from the right side of the felt. This will give the HeatnBond a stronger bond to the fabric.
Cut out the mustache along the traced line. Peel the backing off the HeatnBond. If needed, use the placement on the pattern piece to position the mustache onto the mask. Press in place. Flip and press for a strong bond.

Thread 2 strands of embroidery floss through an embroidery needle and stitch around the mustache using a running stitch. I like to use a contrasting color so that the stitches are visible. Sorry, the running stitch in the picture below looks backwards to those of you who are right handed, I'm a lefty :)

Cut a 10" piece of fold-over elastic. Transfer the fold-over placement markings from the pattern piece to the fabric. Pin elastic to each mark and sew along each edge using a scant 1/4".


Stack both mask pieces RST and sew together using 1/4" seam. Leave a 3" opening along the top edge of the mask.

With a pair of scissors, clip around the curves about every 1/4", take time when clipping not to clip through the seam.

Turn RSO and press. Turn opening under 1/4" and pin closed. Topstitch 1/16 to an 1/8" around the entire mask. (I like to use matching thread for topstitching.) Start topstitching along the top at the opening. *The picture below doesn't show the opening pinned closed, sorry…I generally don't use pins, but if you need them, pin the opening closed and then sew.

Keep the elastic on top of the mask. When approaching the elastic, pull it out of the
way of the sewing machine. You don't want to sew over the exposed elastic.


That can be it, or you can add a second row of topstitching, it's not necessary, but it gives the project a nice finished look. Using a 1/4" foot, topstitch 1/4" away for the first row of topstitching.

I love this fun little project and it's really quick! I think all the girls at her stache bash are going to love these!

Happy Sewing!

Friday, January 15, 2016
Catching Up!
It's 2016 and things are super busy here in our temporary Georgia studio.
Our newest items get outta town, and Miss Sally are now available on our website!


 Little miss Regan thinks she needs some heals!

Our newest items get outta town, and Miss Sally are now available on our website!


I love the pleats on the bodice.
The fabric shown on both covers is #LaughloveQuit. It's available now at your local quilt shop.
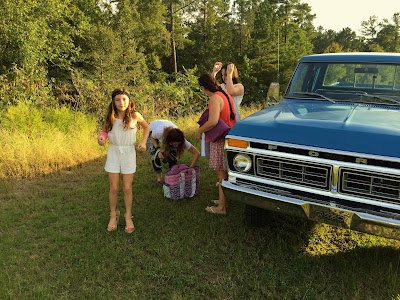
This last photo shoot was so much fun. Here are a few pictures of our adventure!


It takes a circus to keep us going! Thanks to our friends for the use of their awesome truck and all the extra help behind the scenes! My beautiful models Miss Sarah and Miss Regan, you did great!
Tuesday, September 15, 2015
Another Happy Blog Hopping Day!
Hey everyone! I'm so glad you stopped by. I am pretty excited to have been included in this blog hop celebrating such a great accomplishment and company Jaftex Corp. Jaftex is a parent company of Henry Glass, Blank Quilting Corp., and Studioe Fabrics, which supplies us with high quality, beautiful


85th Anniversary Giveaway
fabric! I don't know about you, but I love a great piece of fabric!
I used the Folio Collection for this tote to organize all my important, can't live without, stuff! I have to admit, I really like how it turned out.
Jaftex History:
Jaftex Corp. was founded in the 1930’s when Jacob A. Fortunoff started selling fabric on the streets of New York. At that time, the mainstay of the business was women’s sleepwear and lingerie. In the 80’s, Jacob’s grandson, Robert, dramatically changed the business of the company. The business focus was transferred to the over the counter quilt industry when Robert purchased companies like A.E. Nathan, Henry Glass, Stylemaker, Chanteclaire, Fabric Editions/Studioe and more recently The Blank Quilting Corp. Robert is now joined by his two sons, Scott and Greg.


Don't forget to enter to win here (with a comment) as well for a chance to win this beautiful Folio fat quarter bundle.
If you get a minute, check out my new line of fabric #laughlovequilt along my side bar. It will be arriving in quilt shops this November!
A big thank you to our amazing sponsors!
Have fun hopping around!
xo
Amy
Monday, August 31, 2015
Jaftex 85th Anniversary Blog Hop

I have listed the blog hop schedule on my side bar along with a link to each blog. This should help you navigate easily to each blog.
If you are interested, here is a list of the prizes you could win!
1st Prize:
Blog Readers - Janome Skyline S5 sewing machine and 20 fat quarters
Your Favorite Quilt Shop: 30 bolts of fabric.
2nd Prize:
Blog Readers - 15 fat quarters and a box of Aurifil Thread (48) spools
Your Favorite Quilt Shop: 15 bolts of fabric.
3rd Prize:
Blog Readers - 6 fat quarters and a special edition tin from Schmetz Needles
Your Favorite Quilt Shop: 6 bolts of fabric.
A huge thank you to our sponsors, Aurifil Threads, Schmetz Needles and Janome!
Have fun :)
Amy
85th Anniversary Giveaway
Friday, June 26, 2015
Hello….I've Missed You!
It's been a while since I've posted, and I've missed you! I always say I'm going to do better, but life gets in the way of all the fun! I feel like the teenager telling his or her parents what they want to hear. Probably with good intentions, but never following through. So I'm not going to tell you my goal is to be the 2015 blogger of the year, just that I'm sorry I haven't been around!
Kati Cupcake just released four new patterns that you should see trickling into your local quilt shops about now.
Bullseye is a throw size quilt featuring a star block with a Bullseye center and bordering modern arrows. I love the modern/vintage feel to this playful quilt. It also includes a mini Bullseye quilt just as an extra, and it's Jelly roll friendly.

Eclectic is also jelly roll friendly and a throw size quilt! I love the scrappy happy modern look! This one is proudly used and abused in the Hamberlin household.

Next up……is Cutie Pie! This one is a baby size quilt, but could easily be sewn into a throw!

Momma Mia is our final spring Design. I love the lines on this bag and the size!
It also has an optional middle divider zipper pouch shown below.

All of our new patterns are available here on my website including down loadable patterns.
My new fabric line #LaughLoveQuilt ships in November!

Monday, December 8, 2014
Our Winner
It's been fun! Thanks to all of you for your participation. It was so fun reading all of your comments :)
Our winner is Karen in Breezy Point! You will be getting an email from Martingale soon!
Congrats!
Our winner is Karen in Breezy Point! You will be getting an email from Martingale soon!
Congrats!
Saturday, November 29, 2014
A Flair for Fabric Blog Hop Give Away!
I'm so excited it's my turn today! It's been really fun to follow along the blog hop and read all of the posts from each designer and hear what they have to say about the book, some of the projects and their tips.


Tuesday, December 2: Little Quilts (http://littlequilts.blogspot.com/)
Wednesday, December 3: Lizzie B Cre8ive (http://www.lizziebcre8ive.com/#!blogger-feed/cvl9)
Thursday, December 4: Heather Mulder Peterson (https://ankastreasures.wordpress.com/)
Friday, December 5: Jacquelynne Steves (http://jacquelynnesteves.com/blog/)
Saturday, December 6: Wrap up at the Henry Glass blog (http://henryglassfabrics.blogspot.com/)
One of my most favorite things in the world, crazy as it sounds is finding a quilt shop with a good variety of fabric and just wondering through it for a bit. I just watch how people relate to fabric and the excitement they share with those around them when they find a piece or a collection they just can't live without!
Years ago, I had woman that I had never met walk into my Quilt Shop with a very important project in mind. She wanted to make a quilt for her sister, who was going through some serious medical issues. This quilt was meant to comfort her sister through her many treatments.
She was a beginner quilter and didn't feel comfortable picking and choosing lots of different fabrics.
We walked around the shop, found a line of fabric that she loved, and added a couple funky pieces to the mix. When we were finished she was so excited and ready to start her project, and I felt very close to someone I didn't even know just 10 minutes prior! I love how quilting and sewing brings us together!
There are so many different ways to pick out fabric, mixing and matching, or the opposite not matching at all. If you are a beginner quilter, and picking fabrics is a little scary, find a line of fabric that you love, throw in a couple different unexpected pieces and your done!
Line Upon Line is a quick fun happy baby quilt or table topper. Designed
and quilted by Amy Hamberlin (that's me! :))
I love this project, Where Flowers Blossom by Lizzie B. Cre8ive!
And also Breezy by Jill Finley
We are giving away an eBook of A Flair For Fabric, and a bundle of Henry Glass fabric from Fresh Designs "At the Zoo" Shown here
I have noticed that quilters and sewers quilt and sew with a purpose! What is your most meaningful
fabric related project and who was it for?
Answer my question, and you will be entered to win!
The give away will end December 6th when the blog hop ends. I will announce the winner shortly thereafter!
Want to buy the Book, click here!
Here is a list of stops remaining on the hop!
Wednesday, December 3: Lizzie B Cre8ive (http://www.lizziebcre8ive.com/#!blogger-feed/cvl9)
Thursday, December 4: Heather Mulder Peterson (https://ankastreasures.wordpress.com/)
Friday, December 5: Jacquelynne Steves (http://jacquelynnesteves.com/blog/)
Saturday, December 6: Wrap up at the Henry Glass blog (http://henryglassfabrics.blogspot.com/)
Thank you so much for participating! We love that you love fabric :)
Hugs,
Amy
Tuesday, November 18, 2014
A Flair for Fabric Blog Hop

This blog hop is going to be fun……so don't miss out. Lots of give-aways and great sewing tips will be shared at each blog on the hop. Click HERE for your first stop. Let this creative blog hop begin!
Friday, May 9, 2014
That's How We Roll!
Here is a video from Heirloom Creations, showing their bag of the month That's How We Roll!
Thursday, May 8, 2014
Life is Better When You Feel Better
I am somewhat introverted and have a hard time sharing personal experiences with others. Because of the health problems I have faced over the last two years, I have realized that somethings just need to be shared.
I had a second brain surgery in early December. The tumor behind my left eye, was not cancerous, but it was attached to my optic nerve, threatening my eye sight. Thankfully, my surgeons successfully detached it with no damage to my nerve (it's a coin toss 50/50). I am happy to report that they saved my sight. Miracles still happen everyday!
After surgery I had a really hard time dealing with my children and coping with day to day activities. Not knowing this was likely to be a direct result of frontal lobe brain surgery, I didn't know how to cope with it. To be honest I was starting to scare myself. My husband was working far from home and I was facing this basically on my own. I shared things with him over the phone that I'm sure made him feel hopeless and scared, not really knowing how to help me. I was ready to go to the doctor to get on some anti-depressants, when a friend of mine shared Q96 with me. Which is a vitamin/mineral supplement. It's crazy what can happen to our bodies when we give it what it needs! You don't have to be bipolar for this to help you, I am not. I met Autumn Stringam and heard her story and a few others that blew my mind away. What did I have to loose? I didn't want to go on medication, but I knew it might be inevitable. After just a few weeks of taking Q96, I started to feel changes. The fog started to lift, and my energy level started to increase. I've now been on it for about 2-1/2 months and I cannot believe how good I feel. I often wonder why I have been given such a wonderful life and have recently realized that those thoughts and feeling were nowhere near my soul just months ago! I really do have a great life full of wonderful people, the best part is I know it and feel it again!
I still face the unknown with my genetic disease, and life in general, but at lease I can feel good while I'm facing it!
I hope these video's help you or someone you love! Thank you so much to that person (you know who you are) that shared this with me.
If you or someone you know is interested in these supplements, I do not sell them, but you can get in touch with someone who does by going to this website.
xoxo
~Amy
I had a second brain surgery in early December. The tumor behind my left eye, was not cancerous, but it was attached to my optic nerve, threatening my eye sight. Thankfully, my surgeons successfully detached it with no damage to my nerve (it's a coin toss 50/50). I am happy to report that they saved my sight. Miracles still happen everyday!
After surgery I had a really hard time dealing with my children and coping with day to day activities. Not knowing this was likely to be a direct result of frontal lobe brain surgery, I didn't know how to cope with it. To be honest I was starting to scare myself. My husband was working far from home and I was facing this basically on my own. I shared things with him over the phone that I'm sure made him feel hopeless and scared, not really knowing how to help me. I was ready to go to the doctor to get on some anti-depressants, when a friend of mine shared Q96 with me. Which is a vitamin/mineral supplement. It's crazy what can happen to our bodies when we give it what it needs! You don't have to be bipolar for this to help you, I am not. I met Autumn Stringam and heard her story and a few others that blew my mind away. What did I have to loose? I didn't want to go on medication, but I knew it might be inevitable. After just a few weeks of taking Q96, I started to feel changes. The fog started to lift, and my energy level started to increase. I've now been on it for about 2-1/2 months and I cannot believe how good I feel. I often wonder why I have been given such a wonderful life and have recently realized that those thoughts and feeling were nowhere near my soul just months ago! I really do have a great life full of wonderful people, the best part is I know it and feel it again!
I still face the unknown with my genetic disease, and life in general, but at lease I can feel good while I'm facing it!
I hope these video's help you or someone you love! Thank you so much to that person (you know who you are) that shared this with me.
If you or someone you know is interested in these supplements, I do not sell them, but you can get in touch with someone who does by going to this website.
xoxo
Monday, April 14, 2014
Get Inspired!
I know the first of the year is over and we've all put our New Years resolutions behind us…..but I'm a little behind this year. Not that I want to have a tell all session, but one of the hardest things for me is being content. Maybe it's the creative side of me that is always wanting to move on, something more, something different and I don't necessarily want to change that part of me. I guess it's enjoying now…right now, today and all the good, the bad, the boring and excitement, the creative highs and lows that comes with each new day. We all have constant instabilities and insecurities that surface in our lives from time to time. Learning that it's okay and moving past those things that we can't fix, change or control is empowering! How we do it is the complicated part.
I have found that part of that never ending journey for me is finding what makes me happy…….one of those things besides my family and all the fun that comes with that is inspiration, brain stimulation which creates motivation!
I have recently become a book junky! Seriously overnight I have a library of books from social network books to drawing, quilting, photography, illustrator and in the front of Lori Greiner's (from Shark Tank) new book Invent it, Sell it, Bank it, she quotes -Ralph Waldo Emerson
"Do not go where the path may lead. Go instead where there is no path and leave a trail."
-Ralph Waldo Emerson
Inspiration, not just creative inspiration but also life's inspiration can come from almost anything! It's catching it and tucking it away in your brain so that when you need it, you can find it. If you can write it down, inspiration is sometimes a feeling and you can't write that down, but you can write down
how you felt an what created that feeling.
My resent surgeries have helped…. okay...forced me to slow down and take time to enjoy each day and the important things that go on around me. There is always good that comes from a hard things! They may be hard to find…if you can't find it…..dig a little deeper and you will.
Now to the fun part……paint your world with things you love!
My favorite thing is color! I can't help but smile when I touch a piece of fabric that is full of beautiful color, or walk into a book store and find a piece of inspiration!

Things that inspire me may not inspire you……here are a few things that inspire me
Ellie Goulding very talented music artist!
Soft and Stable (I am love…..loving this!)
Mint Converse (it's the color I promise)! No….I've always had a thing for Converse!

I found this book today at Barnes and Noble and I'm in love with all the color and style in this book!
Even the most unpredictable things can cause you to take notice and find beauty in them……like the water spicket on the side of my 100 + old house! I love the new growth of the bright greenery up against the weathered stone. See…... Idaho isn't totally brown!

I just started digging into this book and I'm really loving it! It's hard to admit how behind the times I am socially…..LOL!! Check him out here!

Issue #5 of Love Patchwork & Quilting This is a fun new magazine that is packed full of fun fresh sewing/quilting ideas!

Your challenge…..find one thing you love and dig in!
xx
xx
~ Amy
Subscribe to:
Posts (Atom)